2편에서는 실제로 좀더 작은 예제를 빌드해 볼겸, 이렇게 pybinding을 가능하게 하는 .so 파일에 대해 알아본다.
1. 직접 build해서 test해보기
Toy pybinding 코드를 build해서 살펴보자.
해당 레포지토리의 README.md를 따라 build해보면, 폴더 내에 아래와 같은 세 파일이 생성된다 (주의: 폴더가 지저분해지지만, build 폴더 만들어서 cmake ..하지말고 cmake .을 해야한다. .so 파일과 실행파일인 .py가 동일한 폴더에 있게 하기 위함) .
hello.cpython-38-x86_64-linux-gnu.so
dico.cpython-38-x86_64-linux-gnu.so
image.cpython-38-x86_64-linux-gnu.so
그리고 이러한 파일이 생성된 후,
python3 hello.py
# or
python3 dico.py
# or
python3 image.py
를 실행하면, 각각 pybinding이 성공적으로 동작하는 것을 볼 수 있다.
2. 내부 코드 확인
hello라는 module을 예시로 들어보자. src/hello.hpp에 class가 선언되어 있고, src/hello.cpp에 보면 아래와 같이 PYBIND11_MODULE이 정의되어 있다:
PYBIND11_MODULE(hello, m)
{
    m.doc() = "An extraordinary package to greet people";
    py::class_<test::Test> test(m, "Test");
    test.def(
        "hello_world", test::Test::hello_world,
        "An extraordinary function to greet people")
    .def("get_hello_world", &test::Test::get_hello_world,
         "An extraordinary function to learn how to greet people")
    .def("hello_name", &test::Test::hello_name,
         "An extraordinary function to politely greet people")
    .def("hello_list", &test::Test::hello_list,
         "An extraordinary function to greet several people at a time")
    .def("hello_obj", &test::Test::hello_obj,
         "An extraordinary function to greet more precisely people")
    .def("get_2_names", &test::Test::get_2_names,
         "Get the name of 2 extraordinary persons (Thus has pseudo-lexicographic "
         "order higher than the other)")
        ;

    py::class_<test::Test::Person>(test, "Person")
        .def(py::init<const std::string &, const int &>())
        .def_readonly("name", &test::Test::Person::name)
        .def_readonly("age", &test::Test::Person::age);
}
Python에서 "TEST"라는 이름으로 쓸 class를 py::class_<test::TEST>으로 선언하는 것을 볼 수 있고 C++ 상의 test::Test 클래스의 함수들도 .def를 통해 정의되는 것을 볼 수 있다.
여기서 중요한 건, 저기 PYBIND11_MODULE() 함수 부분에도 hello로, 우리가 지정하고자 하는 package의 이름을 꼭! 써줘야 한다는 것이다. 최근에 이 PR에서 robin_py를 spark_robin으로 바꾸는 과정에서 저 pybind cpp 코드의 이름을 바꿔야 한다는 걸 놓쳐서 하루종일 무엇이 문제인지 디버깅했다 ㅠ. 그러니 까먹지 말자!
그 후, hello.py에서 아래와 같이 불러와서 위의 hello 모듈을 실행시킨다:
#!/usr/bin/env python3

from hello import Test
import numpy as np

if __name__ == '__main__':
    Test.hello_world()
    Test.hello_name("Enguerrand")

    Test.hello_list(np.array([
        1, 2, 3, 4
    ]))

    obj = Test.Person("Guillaume", 20)
    Test.hello_obj(obj)

    print(Test.get_2_names())
즉 from hello import TEST를 통해 hello module의 TEST 클래스를 import하고,
PYBIND11_MODULE에서 정의했던 함수들의 이름을 이용해서 각각 hello_world(), hello_name(), hello_list()를 실행하는 것을 볼 수 있다.
3. .so의 이해
이는 사실 생성된 .so 파일을 읽어서 동작이 되는 것이다. 만약 .so를 다른 폴더로 옮기고 파일을 실행시키게 되면, error가 나는 것을 볼 수 있다.
즉, pybinding을 한다는 행위는 C++ 코드를 Python에서 사용할 수 있게끔 shared object를 만들어주는 행위라고 이해하면 될 거 같다.
이 .so 파일은 Linux와 UNIX 계열 운영 체제에서 사용되는 “shared object” 파일로, 윈도우에서 우리가 exe를 통해 어떤 프로그램을 깔면 해당 프로그램의 폴더 내에 생기는 .dll 파일과 유사하다.
4. Q. 로컬 환경에서 pybinding된 코드를 자유롭게 사용하려면?
다시 cmake_example로 돌아가서 살펴보자면, 그럼 왜 여기서는 아무 터미널창에서 python을 실행시켜서 import를 해도 됐던걸까?
그 이유는 setup.py 내에 있는데, cmake_example/setup.py 내부를 살펴보면 아래와 같이 작성되어 있는 것을 볼 수 있다.
setup(
    name="cmake_example",
    version="0.0.1",
    author="Dean Moldovan",
    author_email="dean0x7d@gmail.com",
    description="A test project using pybind11 and CMake",
    long_description="",
    ext_modules=[CMakeExtension("cmake_example")],
    cmdclass={"build_ext": CMakeBuild},
    zip_safe=False,
    extras_require={"test": ["pytest>=6.0"]},
    python_requires=">=3.7",
)
우리가 1편에서 pip3 install 한 행위가 이 setup.py를 실행하는 행위라 볼 수 있는데,
Python의 setup.py 파일은 Python 패키지를 빌드, 설치 및 배포하는 데 사용되는 스크립트 파일이다.
이 파일은 setuptools 라이브러리를 통해 실행되며 (그래서 파일 내를 살펴보면 setuptools를 import하고 있음),
Python 패키지를 관리하고 패키지의 메타데이터 및 의존성을 설정하는 데 필요한 정보를 포함한다.
사실 setup.py는 아래와 같이 패키지에 관련된 많은 작업들을 할 수 있다:
- 패키지 정보 설정: 패키지의 이름, 버전, 저작자 정보, 설명 등의 메타데이터를 설정
- 패키지 의존성 정의: 패키지가 의존하는 다른 패키지를 명시하고, 이러한 의존성을 자동으로 설치할 수 있도록 설정
- 패키지 파일 지정: 패키지에 포함될 파일과 디렉토리를 지정하고, 패키지 구조를 정의
- 설치 및 배포 설정: 패키지를 설치하고 배포하는 방법을 설정 이는 패키지를 PyPI(Python Package Index)에 업로드하거나 로컬 시스템에 설치하는 데 사용됨
그래서 다시 pip3 install ./cmake_example을 했을 때 뜨는 로그를 살펴보면 ‘wheels’와 관련된 뭔가가 뜨는 것을 볼 수 있다:
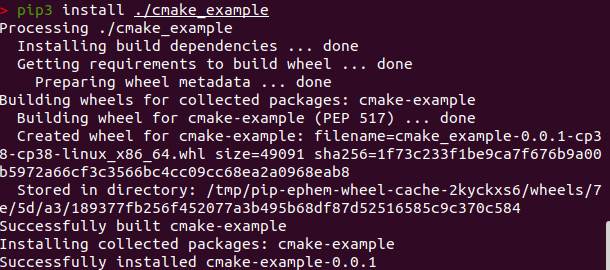
wheel는 쉽게 얘기하면, Python 패키지의 바이너리 배포형식이다. 즉, 직접 수정은 못 하지만 설치하여 사용 가능한 library 형태로 만들어주는 파일 형태이다.
즉, pybinding을 잘해서 binding에 성공한 후 local 환경에서 폴더의 상대위치에 상관없이 자유롭게 사용하기 위해서는
- 이 wheel 파일이나 .so 파일을 만들어서
- Python interpreter에게 해당 wheel 파일이나 .so 파일이 어디 위치하고 있는지 위치 정보만 알려주면
사용할 수 있다.