ImageProjection in LeGO-LOAM (2) Cloud Segmentation using Clustering
(Cont’d)

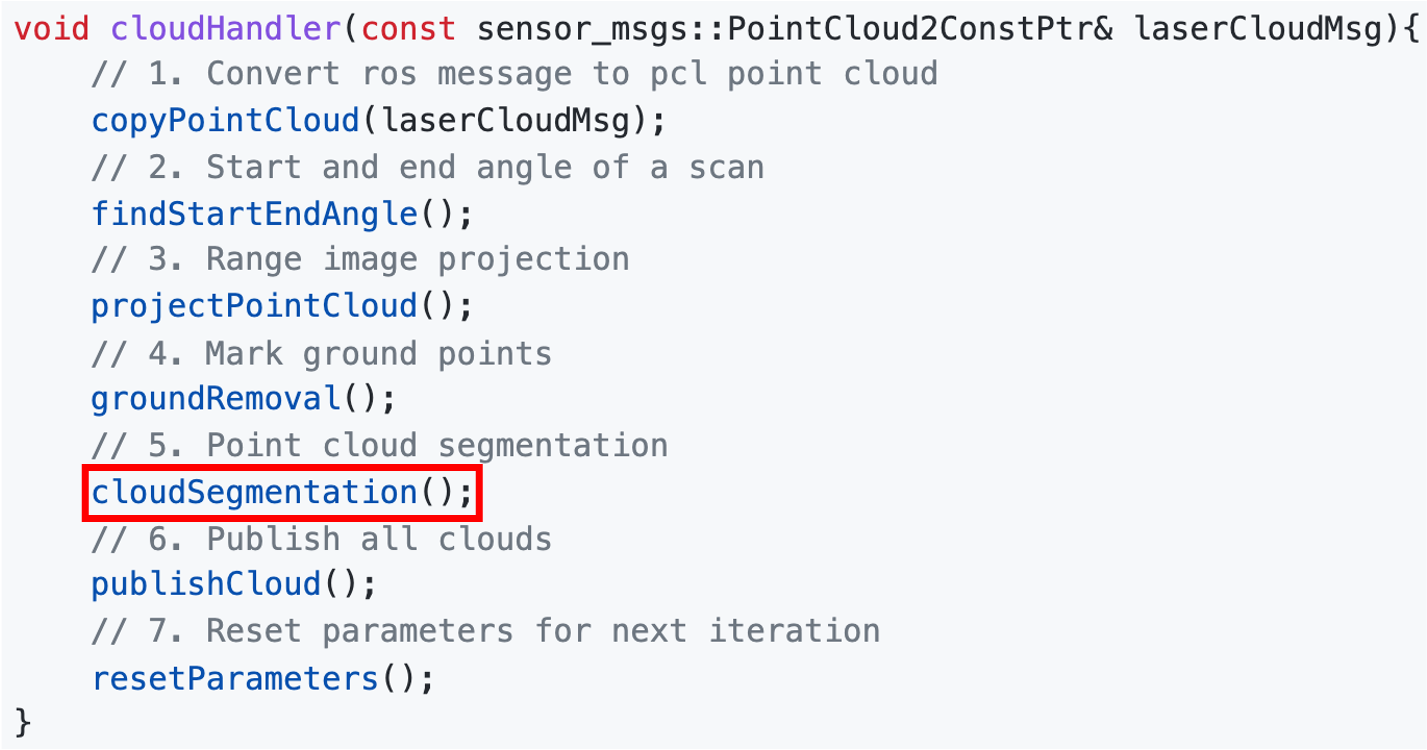
5. cloudSegmentation()
cloudSegmentation() 함수에서는 앞선 과정의 결과인 labelMat를 입력으로 받는다. labelMat의 non-ground points는 아직 0으로 할당되어 있는데, 픽셀들을 입력값으로 하여 최종적으로 유효한 points를 segmentation한다. 여기서 최종적인 결과인 ‘유효한 points’라는 말은 해당 points를 이용하여 feature를 추출했을 때 그 피쳐가 기하학적인 특성을 띌 것 같은 물체로부터 측정된 points들을 뜻한다 (도심 환경을 예로 들면 전봇대, 건물의 벽면, 나무 줄기, 자동차 옆면 등등). 전체 과정은 아래와 같다.
void cloudSegmentation(){
    // segmentation process
    for (size_t i = 0; i < N_SCAN; ++i)
        for (size_t j = 0; j < Horizon_SCAN; ++j)
            if (labelMat.at<int>(i,j) == 0)
                labelComponents(i, j);

    int sizeOfSegCloud = 0;
    // extract segmented cloud for lidar odometry
    for (size_t i = 0; i < N_SCAN; ++i) {

        segMsg.startRingIndex[i] = sizeOfSegCloud-1 + 5;
        for (size_t j = 0; j < Horizon_SCAN; ++j) {
            if (labelMat.at<int>(i,j) > 0 || groundMat.at<int8_t>(i,j) == 1){
                // outliers that will not be used for optimization (always continue)
                if (labelMat.at<int>(i,j) == 999999){
                    if (i > groundScanInd && j % 5 == 0){
                        outlierCloud->push_back(fullCloud->points[j + i*Horizon_SCAN]);
                        continue;
                    }else{
                        continue;
                    }
                }
                // majority of ground points are skipped
                if (groundMat.at<int8_t>(i,j) == 1){
                    if (j%5!=0 && j>5 && j<Horizon_SCAN-5)
                        continue;
                }
                // mark ground points so they will not be considered as edge features later
                segMsg.segmentedCloudGroundFlag[sizeOfSegCloud] = (groundMat.at<int8_t>(i,j) == 1);
                // mark the points' column index for marking occlusion later
                segMsg.segmentedCloudColInd[sizeOfSegCloud] = j;
                // save range info
                segMsg.segmentedCloudRange[sizeOfSegCloud]  = rangeMat.at<float>(i,j);
                // save seg cloud
                segmentedCloud->push_back(fullCloud->points[j + i*Horizon_SCAN]);
                // size of seg cloud
                ++sizeOfSegCloud;
            }
        }

        segMsg.endRingIndex[i] = sizeOfSegCloud-1 - 5;
    }


    // extract segmented cloud for visualization
    if (pubSegmentedCloudPure.getNumSubscribers() != 0){
        for (size_t i = 0; i < N_SCAN; ++i){
            for (size_t j = 0; j < Horizon_SCAN; ++j){
                if (labelMat.at<int>(i,j) > 0 && labelMat.at<int>(i,j) != 999999){
                    segmentedCloudPure->push_back(fullCloud->points[j + i*Horizon_SCAN]);
                    segmentedCloudPure->points.back().intensity = labelMat.at<int>(i,j);
                }
            }
        }
    }
}
cloudSegmentation()로 돌아가서 살펴보면 전체적인 절차는 아래와 같이 크게 세가지로 나눠진다.
a) Set labelMat by using labelComponenets function
// segmentation process
for (size_t i = 0; i < N_SCAN; ++i)
   for (size_t j = 0; j < Horizon_SCAN; ++j)
       if (labelMat.at<int>(i,j) == 0)
           labelComponents(i, j);
위의 결과로, labelMat의 전체 값은
- -1 (range measurement가 없음)
- 999999 (segment의 point 수가 적음. sub-cluster로 간주하여 유효하지 않다고 판단)
- 0보다 큰 1 이상의 어떤 값으로 할당되게 된다.
3D point cloud는 데이터 특성상 상당히 sparse하기 때문에, labelComponents(i, j) 함수를 통해 noise points나 덤불(bushes)같이 기하학적인 관점에서 repeatable한 feuture가 뽑힐 것 같지 않은 point cloud를 masking한다. 자세한 과정을 아래에서 설명한다.
labelComponents(i, j)
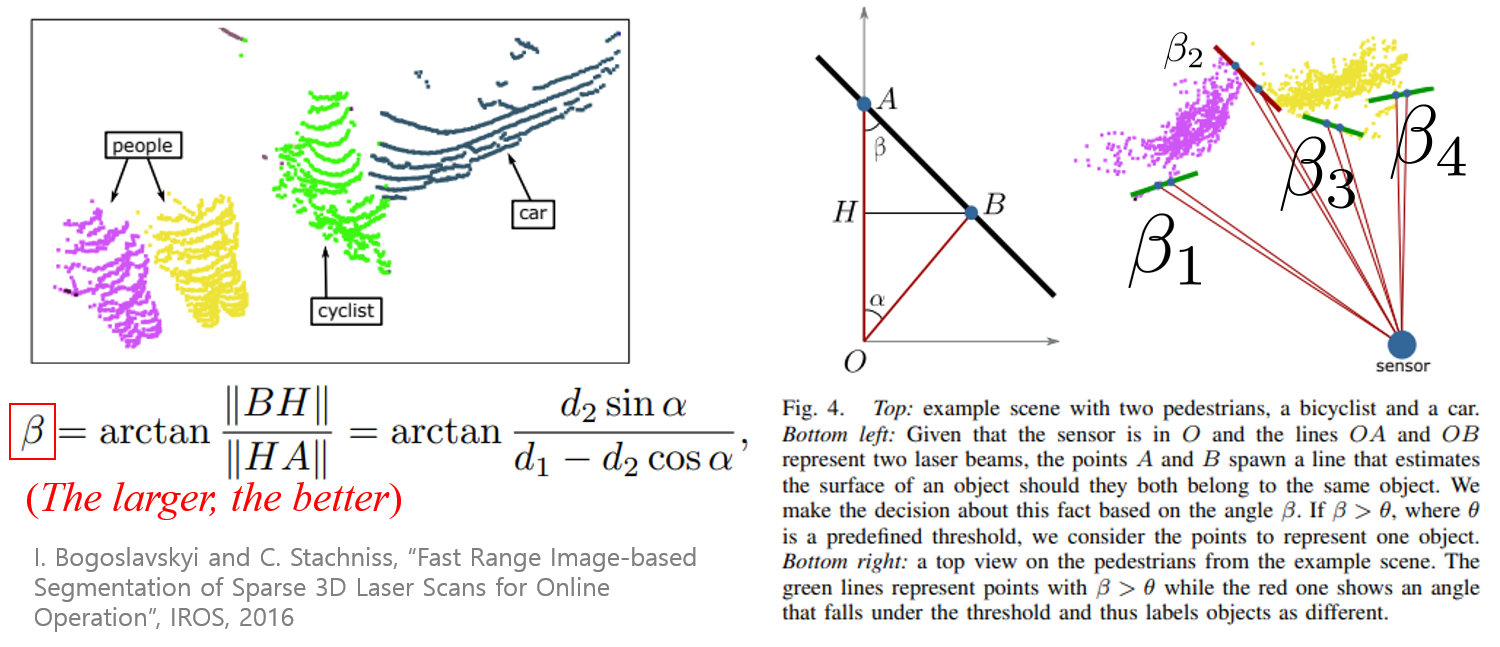
Segmentation의 핵심은 이 labelComponents(i, j) 함수이다. 이 함수를 통해서 labelMat.at<int>(i,j)이 0으로 할당되어 있는 pixels들을 Breadth-First Search (BFS) 기반으로 clustering을 하는데, 이 방법은 아래 IROS 2016 논문의 object clustering method를 활용했다.

전체 코드는 아래와 같은데, 코드를 읽기 전 각 변수를 먼저 살펴본다.
사용되는 변수들은 아래와 같이 클래스가 선언될 때 private 멤버 변수로 선언되어 있다.
std::vector<std::pair<int8_t, int8_t> > neighborIterator; // neighbor iterator for segmentaiton process

uint16_t *allPushedIndX; // array for tracking points of a segmented object
uint16_t *allPushedIndY;

uint16_t *queueIndX; // array for breadth-first search process of segmentation, for speed
uint16_t *queueIndY;
neighborIterator: 아래와 같이 neighbor라는 pair 객체로 BFS로 뻗어나가는 방향을 미리 정의해둔다.
std::pair<int8_t, int8_t> neighbor;
neighbor.first = -1; neighbor.second =  0; neighborIterator.push_back(neighbor);
neighbor.first =  0; neighbor.second =  1; neighborIterator.push_back(neighbor);
neighbor.first =  0; neighbor.second = -1; neighborIterator.push_back(neighbor);
neighbor.first =  1; neighbor.second =  0; neighborIterator.push_back(neighbor);
그리고 index를 관리하는 아래의 array들이 미리 할당되어 있다. 근데 코드 동작하는 걸 보면 사실 원저자의 주석을 살펴보면 이렇게 array를 미리 할당해서 사용하는 것은 속도를 빠르게 하기 위해서라고 한다 (std::queue, std::vector, std::deque를 쓰면 상당히 느려진다고 함! 아마 수십개의 query를 push_back/pop_front하는 게 연산적으로 비효율적이라고 판단한 것으로 추정됨)allPushedInd와 queueInd를 따로 있을 이유가 전혀 없다…
allPushedIndX = new uint16_t[N_SCAN*Horizon_SCAN];
allPushedIndY = new uint16_t[N_SCAN*Horizon_SCAN];

queueIndX = new uint16_t[N_SCAN*Horizon_SCAN];
queueIndY = new uint16_t[N_SCAN*Horizon_SCAN];
각 변수가 뭘 뜻하는지 확인했으니, 그 후 labelComponents(int row, int col)로 돌아와 설명을 진행한다. ㅇ래 코드를 보면 BFS 기반으로 clustering을 시행하는 것을 확인할 수 있다. 편의상 주석으로 설명을 대체한다.
void labelComponents(int row, int col){
    // use std::queue std::vector std::deque will slow the program down greatly
    float d1, d2, alpha, angle;
    int fromIndX, fromIndY, thisIndX, thisIndY;
    bool lineCountFlag[N_SCAN] = {false};

    queueIndX[0] = row;
    queueIndY[0] = col;
    int queueSize = 1;
    int queueStartInd = 0;
    int queueEndInd = 1;

    allPushedIndX[0] = row;
    allPushedIndY[0] = col;
    int allPushedIndSize = 1;

    while(queueSize > 0){
        // Pop point
        fromIndX = queueIndX[queueStartInd];
        fromIndY = queueIndY[queueStartInd];
        --queueSize;
        ++queueStartInd;
        // Mark popped point
        labelMat.at<int>(fromIndX, fromIndY) = labelCount;
        // Loop through all the neighboring grids of popped grid
        for (auto iter = neighborIterator.begin(); iter != neighborIterator.end(); ++iter){
            // new index
            thisIndX = fromIndX + (*iter).first;
            thisIndY = fromIndY + (*iter).second;
            // index should be within the boundary
            // 해석: thisIndX와 thisIndY가 range image 범위 안에 있어야 함
            // i.e. row: 0 ~ N_SCAN - 1, column: 0 ~ Horizon_SCAN - 1
            if (thisIndX < 0 || thisIndX >= N_SCAN)
                continue;
            // at range image margin (left or right side)
            if (thisIndY < 0)
                thisIndY = Horizon_SCAN - 1;
            if (thisIndY >= Horizon_SCAN)
                thisIndY = 0;
            // prevent infinite loop (caused by put already examined point back)
            // 해석: 이미 살펴본 곳이면 제외한다. 이미 살펴본 곳에는 `labelCount`가 할당되는데,
            // 이 `labelCount`는 전체 point cloud에 대한 유효한 segment 수를 센다.
            // 따라서, 오직 0만 아직 확인해보지 않은 pixel을 나타내며,
            // -1: ground로 처리되었거나 point가 projection되지 않은 pixel (in Step 4. `groundRemoval()`)
            // 1 ~: 현재 유효한 segment로 이미 처리된 pixel
            if (labelMat.at<int>(thisIndX, thisIndY) != 0)
                continue;

            // 해석: 위의 수식에서 긴쪽이 d1, 짧은 쪽이 d2가 되어야 함. 위의 그림 참조
            d1 = std::max(rangeMat.at<float>(fromIndX, fromIndY),
                          rangeMat.at<float>(thisIndX, thisIndY));
            d2 = std::min(rangeMat.at<float>(fromIndX, fromIndY),
                          rangeMat.at<float>(thisIndX, thisIndY));
            // 해석: 이미 range image의 한 픽셀 사이의 간격이 정해져 있기 때문에,
            // extern const float segmentAlphaX = ang_res_x / 180.0 * M_PI; (X축, 즉 horizontal한 방향)
            // extern const float segmentAlphaY = ang_res_y / 180.0 * M_PI; (Y축, 즉 vertical한 방향)로 미리 정의된 segmentAlpha 사용
            // 근데 변수명이 아주 헷갈리게 되어 있음...`segmentAlphaX`와 `segmentAlphaY`는 generic한 image 평면 상의 XY 좌표계를 따름(i.e. X: left->right, Y: upper->below)
            // 반면, thisIndX와 thisIndY의 XY는 X: below->upper, Y: left->right
            if ((*iter).first == 0)
                alpha = segmentAlphaX;
            else
                alpha = segmentAlphaY;
            // 해석: angle은 위의 그림의 beta를 나타낸다
            angle = atan2(d2*sin(alpha), (d1 -d2*cos(alpha)));

            // 해석: angle (beta)가 segmentTheta보다 충분히 크면, 이 것은 이어져있는 cluster라고 판별할 수 있으며,
            // 현재 index를 `queueInd`와 `allPushedInd`에 넣어둔다.
            if (angle > segmentTheta){

                queueIndX[queueEndInd] = thisIndX;
                queueIndY[queueEndInd] = thisIndY;
                ++queueSize;
                ++queueEndInd;

                labelMat.at<int>(thisIndX, thisIndY) = labelCount;
                lineCountFlag[thisIndX] = true;

                allPushedIndX[allPushedIndSize] = thisIndX;
                allPushedIndY[allPushedIndSize] = thisIndY;
                ++allPushedIndSize;
            }
        }
    }

    // check if this segment is valid
    bool feasibleSegment = false;
    // 해석: 수가 충분히 많다 -> 유효한 segment이다
    if (allPushedIndSize >= 30)
        feasibleSegment = true;
    // 해석: 수가 segmentValidPointNum (default: 5)보다 많은 경우 segment가 line의 모양을 띄는 지 double-check
    // 왜냐하면 전봇대나 나무 줄기 같은 경우에는 `allPushedIndSize` 자체가 작을 수 있지만,
    // 향후 `featureAssociation.cpp` 단에서 edge feature로서 활용이 가능하기 때문
    else if (allPushedIndSize >= segmentValidPointNum){
        int lineCount = 0;
        for (size_t i = 0; i < N_SCAN; ++i)
            if (lineCountFlag[i] == true)
                ++lineCount;
        // 해석: 그 중 vertical한 방향으로 valide points들이 segmentValidLineNum (default: 3)보다 많을 때
        if (lineCount >= segmentValidLineNum)
            feasibleSegment = true;
    }
    // segment is valid, mark these points
    if (feasibleSegment == true){
        ++labelCount;
    }else{ // segment is invalid, mark these points
        // 해석: cluster가 수가 너무 적거나, 그 개형이 vertical한 line이 아닐 경우에는
        // (i, j) 번째 pixel로부터 시행한 clustering의 결과에 해당하는 모든 points들을 유효하지 않다고 결정
        for (size_t i = 0; i < allPushedIndSize; ++i){
            labelMat.at<int>(allPushedIndX[i], allPushedIndY[i]) = 999999;
        }
    }
}
b) Set segMsg based on rangeMat, groundMat, and labelMat
그 후, featureAssociation.cpp의 입력값인 outlierCloud, segmentedCloud, segMsg를 세팅한다. 각각의 의미는 아래와 같다
outlierCloud: sub-cluster로 간주된 (labelMat의 값이 999999) points들을 5개 간격으로 하여 하나씩 넣음. 주의해야할 것은groundScanInd이상의 channel에서만 outlier를 추출함.segmentedCloud: 여기서의segmented의 의미는 i) ground 중 5칸 당 1개씩, ii) clustering이 유효한 non-ground points를 의미한다.segMsg: 각각에 해당하는 추가적인 정보들이 저장된다. 여기서 주의해야할 것은segMsg의 데이터 순서는 (0, 0)->(0, 1)->…->(0, 1799)->(1, 0)->…->(15, 1799)순으로segmentedCloud에 해당하는 point가 저장된다.
아래의 값 5가 의미하는 것이 명확하지는 않으나 아마 margin을 뜻하는 게 아닌가 싶다. Horizontal 방향으로 5개 마다 1개씩 sampling을 함으로써 points의 숫자를 줄여준다.
int sizeOfSegCloud = 0;
// extract segmented cloud for lidar odometry
for (size_t i = 0; i < N_SCAN; ++i) {

    segMsg.startRingIndex[i] = sizeOfSegCloud-1 + 5;
    for (size_t j = 0; j < Horizon_SCAN; ++j) {
        if (labelMat.at<int>(i,j) > 0 || groundMat.at<int8_t>(i,j) == 1){
            // outliers that will not be used for optimization (always continue)
            if (labelMat.at<int>(i,j) == 999999){
                if (i > groundScanInd && j % 5 == 0){
                    outlierCloud->push_back(fullCloud->points[j + i*Horizon_SCAN]);
                    continue;
                }else{
                    continue;
                }
            }
            // majority of ground points are skipped
            if (groundMat.at<int8_t>(i,j) == 1){
                if (j%5!=0 && j>5 && j<Horizon_SCAN-5)
                    continue;
            }
            // mark ground points so they will not be considered as edge features later
            segMsg.segmentedCloudGroundFlag[sizeOfSegCloud] = (groundMat.at<int8_t>(i,j) == 1);
            // mark the points' column index for marking occlusion later
            segMsg.segmentedCloudColInd[sizeOfSegCloud] = j;
            // save range info
            segMsg.segmentedCloudRange[sizeOfSegCloud]  = rangeMat.at<float>(i,j);
            // save seg cloud
            segmentedCloud->push_back(fullCloud->points[j + i*Horizon_SCAN]);
            // size of seg cloud
            ++sizeOfSegCloud;
        }
    }

    segMsg.endRingIndex[i] = sizeOfSegCloud-1 - 5;
}
각각의 output이 featureAssociation.cpp에서 어떻게 사용되는지는 여기에서 살펴본다.
6. publishCloud() & 7. resetParameters()
그 후, segMsg와 visualization을 위해 ground, non-ground points가 publish되고 내부 변수들은 다음 frame의 point cloud를 다시 preprocessing하기 위해 파라미터들이 reset된됩니다. 자명하므로 생략.
LeGO-LOAM의 line-by-line 설명 시리즈입니다.
- LeGO-LOAM-Line-by-Line-1.-Introduction: Preview and Preliminaries
- LeGO-LOAM-Line-by-Line-2.-ImageProjection-(1): Range Image Projection & Ground Removal
- LeGO-LOAM-Line-by-Line-2.-ImageProjection-(2): Cloud Segmentation using Clustering
- LeGO-LOAM-Line-by-Line-3.-FeatureAssociation-(1): Ready for Feature Extraction
- LeGO-LOAM-Line-by-Line-3.-FeatureAssociation-(2): Corner and Planar Feature Extraction
- LeGO-LOAM-Line-by-Line-3.-FeatureAssociation-(3): Relative Pose Estimation via Two-stage Optimization